How To Grow Mushrooms On Straw

Is Straw Suitable For Beginners?
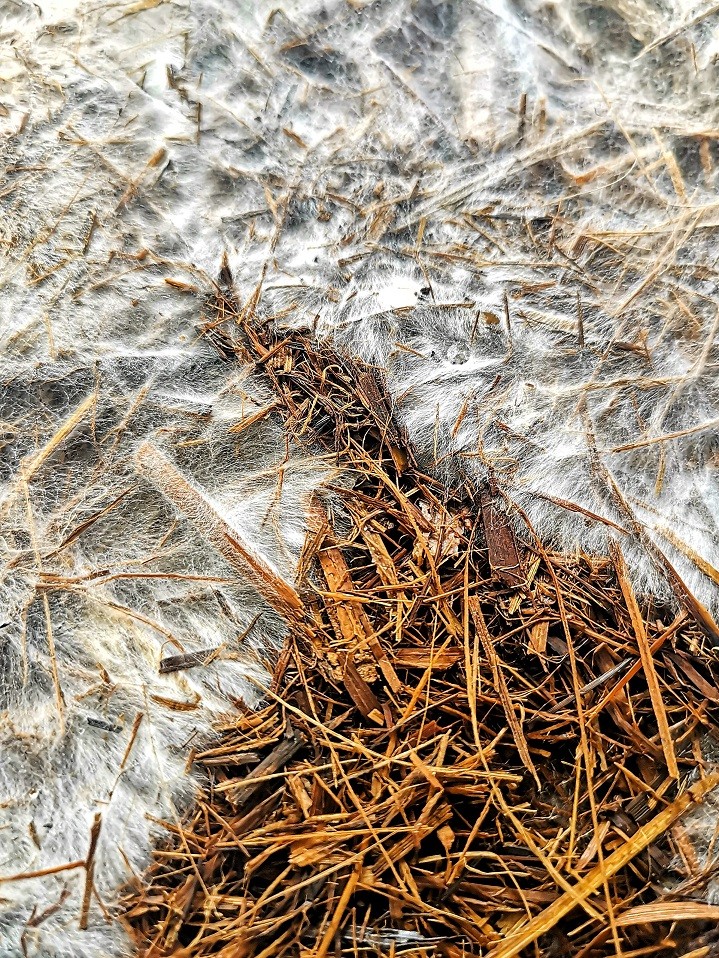
Straw or sugar cane mulch is an excellent choice of substrate for both beginning and experience mushroom cultivators alike. Straw yields generously, colonises quickly and is unlikely to develop contamination if prepared correctly.
Which Mushrooms Will Grow On Straw?
Different species of mushrooms have differing dietary requirements. Most oyster mushrooms will grow extremely well on straw and sugarcane mulch. King oyster will produce small fruits on straw and mulch but will perform notably better on hardwood substrates.
Other straw loving species include agaricus species, psilocybe cubensis, panaeolus cyanescens & volvariella volvacea.
Avoid choosing straw as a substrate for growing lion’s mane, shiitake, enoki & reishi. Mycelium may reluctantly grow with supplementation however it is unlikely to produce many fruits, if any.

Using Coffee As A Supplement?
Fresh coffee grounds can be added to sugar cane mulch & straw as a form of supplementation to increase colonisation times and promote larger yields.
It’s important that the coffee grounds are fresh otherwise they will require pasteurisation.
If growing mushrooms for the first time, it’s recommended to avoid using supplementation as it may increase the chances of contamination forming.

pasteurising Straw
It’s important that straw is pasteurised rather than sterilised. Pasteurisation will reduce microorganism populations on the straw without completely eliminating the microbiome of the substrate, this allows the mycelium to fully colonise the substrate.
For pasteurising larger amounts of substrate, cold water lime pasteurisation is generally suitable. However if the straw is old or damp we recommend using hot water pasteurisation.

Buckets, Bags Or Mushroom Patch?
The choice is many and varied when it comes to choosing which vessel to use for growing your mushrooms, if any at all.
When choosing a vessel it’s important to consider whether it has sufficient holes for ventilation or if the material can be altered for this purpose. As a general rule allow for all substrate to be within 15 – 20 cm from a ventilation/fruiting hole.
Buckets are an excellent choice for cultivating oyster mushrooms, coming in a wide range of sizes to suit your particular space and requirements. Any number of found objects can be recycled for mushroom growing including milk bottles, plastic lunch bags and laundry baskets.
Alternatively, mycelium can be left to colonise the straw in a garden bed, this option can be best for species which prefer growing outdoors, like ink-caps, gold tops and the paddy straw mushroom. It’s important to keep the substrate moist and well protected while colonising. Yields may vary greatly when growing outdoors due to a wide range of variables including humidity and competing organisms.

How Long Does It Take?
Full colonisation may take up to 3 weeks when growing mushrooms in buckets or similar vessels with a 10% spawn rate. This is largely dependant on the species and temperature, oyster mushroom species like pink, white & blue oyster are extremely vigorous and may colonise within 8 days in ideal conditions.
An increased amount of spawn will shorten the colonisation time when well distributed amongst the substrate. Increased spawn will also increase yields due to the higher amount of nutrition.
The colonised substrate will fruit once ideal fruiting conditions are met. This is species dependant however as a general rule mushrooms will require high levels of humidity and an increase in fresh air to trigger fruiting.
What You'll Need?
Learning to make grain spawn is one of the most rewarding steps a mushroom cultivator will take. In the follow articles we discuss what is grain spawn, how to make it and the techniques involved.
- Straw or Sugar Cane Mulch
- Grain Spawn
- Hot Water or Cold Water & Hydrated Lime
- Buckets, Bags or Milk Cartons
- Micro Pore Tape
- Scissor, Knife or Drill (for making ventilation holes)
Today's Best Prices On Straw & Mulch
Step 1. Pasteurise The Substrate
Prepare the substrate with either hot water pasteurisation or cold water lime pasteurisation. Drain the substrate until it no longer drips when squeezed.

Step 2. Prepare Containers
Make sure that all containers have sufficient holes for ventilation and drainage. Make sure that all substrate is within 15 – 20 cm of a ventilation hole, approximately 1 hand-span.
As the mycelium matures it will produce liquid, yellow metabolites which will accumulate within the vessel and hinder colonisation. For this reason a drainage hole should be made on the base of the bucket.
Cover all side holes with micro pore tape in anticipation for packing with substrate.
Step 3. Add Grain Spawn
Break apart the fully colonised grain spawn and incorporate with the substrate. As a general rule we recommend using 10% spawn to substrate by weight. Therefore a 20 L bucket containing 5 kg of substrate will receive approximately 500 grams of grain spawn.
These figures are approximations and should be used a guide only, smaller quantities are often used by experienced cultivators.
Spawn rates will influence colonisation times, therefore larger quantities of spawn will also reduce the risk of contamination developing.
Supplementation can also be added at this step. We recommend starting with supplementation rates of 10% when first starting to work with supplementation, however experienced cultivators often use more.

Today's Best Prices On Grain Spawn
Step 4. Pack Containers & Wait
The spawn and substrate mixture is now ready to be packed into containers. Pack firmly, ensuring that the substrate can still breathe.
The containers can be left to colonise over the following 7 – 21 days. Within this period the substrate will have been colonised by white threads of mycelium. Take note if other colours or formations appear as this may be a sign of contamination.
At times yellow droplets of metabolites may appear on the surface which is completely normal.

Step 5. Fruit & Harvest
Once fully colonised the container can be introduced into fruiting conditions. Fruiting conditions for each species will vary, however this will generally require the container to be placed in an environment with high humidity.
The mycelium will produce coral-like formation, called primordia. These will begin to protrude from the holes in search of fresh air, pushing away the micro pore tape. Fruiting bodies, or mushrooms will begin to form once the expanding mycelium pushes aside the tape. Within 3 – 5 days the mushrooms will be ready for harvesting.


